
Before you start
- The right to create purchase documents, and the right to edit them in order to validate them.
- The four series Purchase - Purchase Order, Purchase - Receipt, Purchase - Invoice and Purchase - Credit Note (chapter 2). Without them, an orange reminder appears and saving stays blocked.
- The supplier exists (chapter 6).
The purchase chain
| Document | What it says | It is created from |
|---|---|---|
| Purchase order (BC) | What you order | Itself, or New purchase on the supplier record |
| Goods receipt (BR) | What actually arrived | One or more validated BCs, or itself |
| Purchase invoice (FA) | What the supplier bills you | A validated BR, a contract (chapter 13), the OCR, or itself |
| Purchase credit note (AV) | What the supplier gives back | A validated FA, or itself |
Each document goes through the same statuses: Draft when saved, Validated when you confirm it, then Transformed as soon as the next document is generated from it. A document gives only one next document: a BC gives a single BR.
Only a draft can be edited. A document without any line cannot be validated: “Unable to validate document”.
The purchase lists
The four lists look alike. The purchase invoice list has two more buttons.
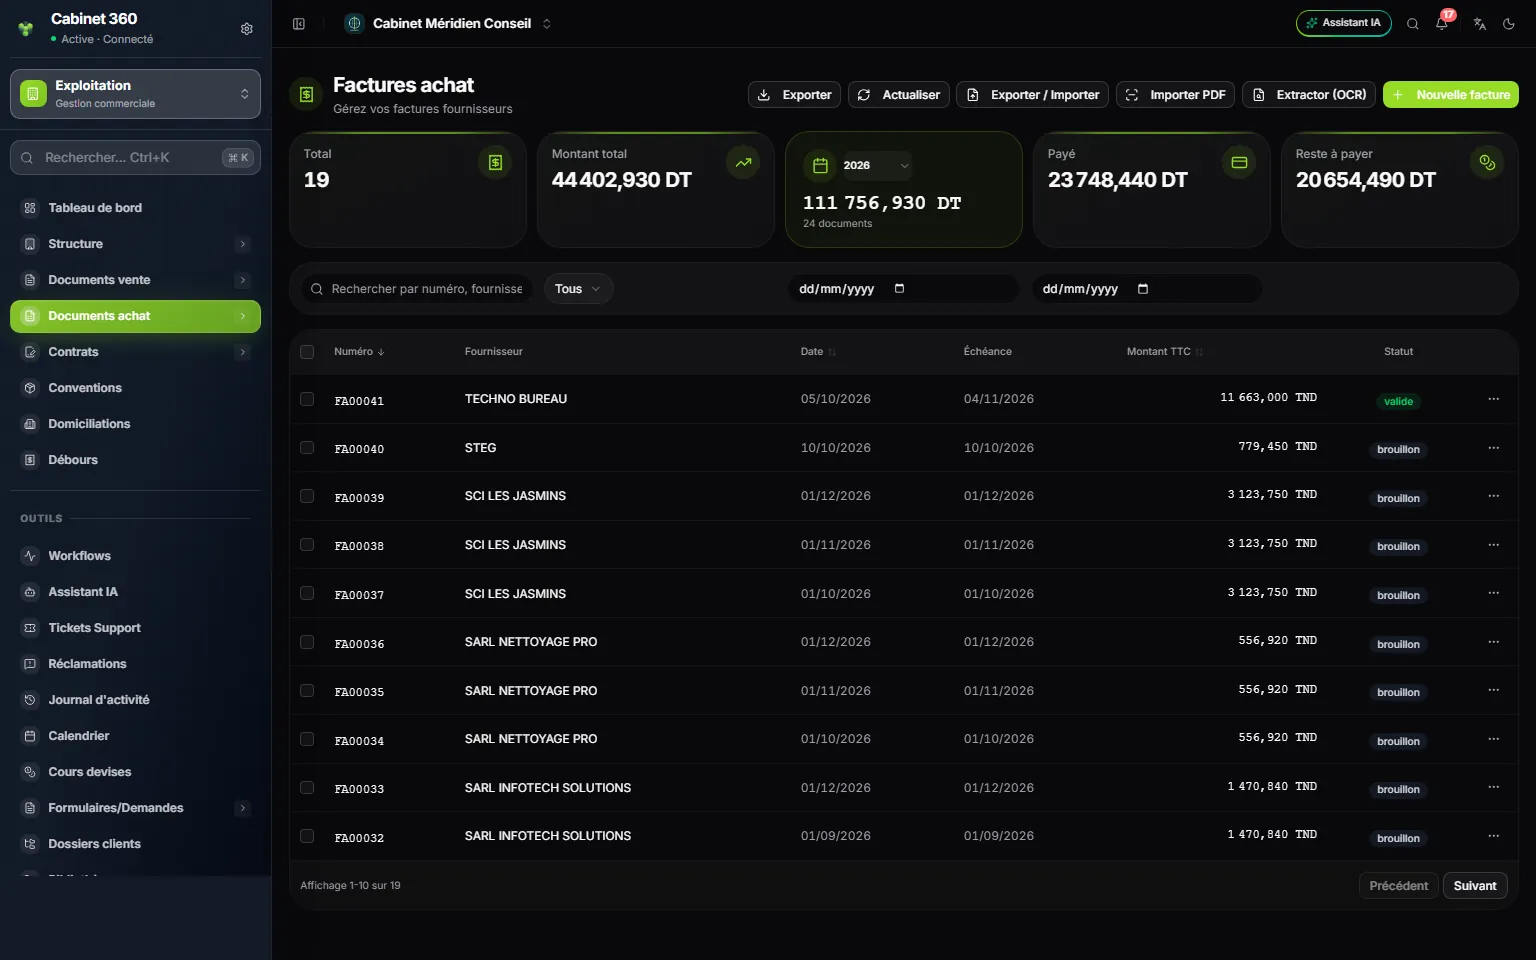
- 1. Export: the purchase journal, in CSV, Excel or PDF.
- 2. Export / Import your documents.
- 3. Import PDF, then Extractor (OCR): have an invoice read by the AI.
- 4. The year chosen and its total incl. tax.
- 5. Unpaid: what is left to pay on your purchase invoices.
- 6. The status, then two dates to bound the list.
- The cards: Total, Total amount, the year, Paid and Unpaid. They cover the whole document type, whatever the filters.
- The filters: the search “Search by number, supplier...”, the status, the Date from and the Date to.
- The columns: Number, Supplier, Date, Due Date, Amount incl. VAT and Status.
- The ⋯ menu: View details, Edit (draft), Download PDF, Delete.
Click a row: the detail panel opens on the right. Its Quick actions offer Validate for a draft, and Generate receipt, Generate invoice or Generate a Credit Note for a validated document.
The entry page
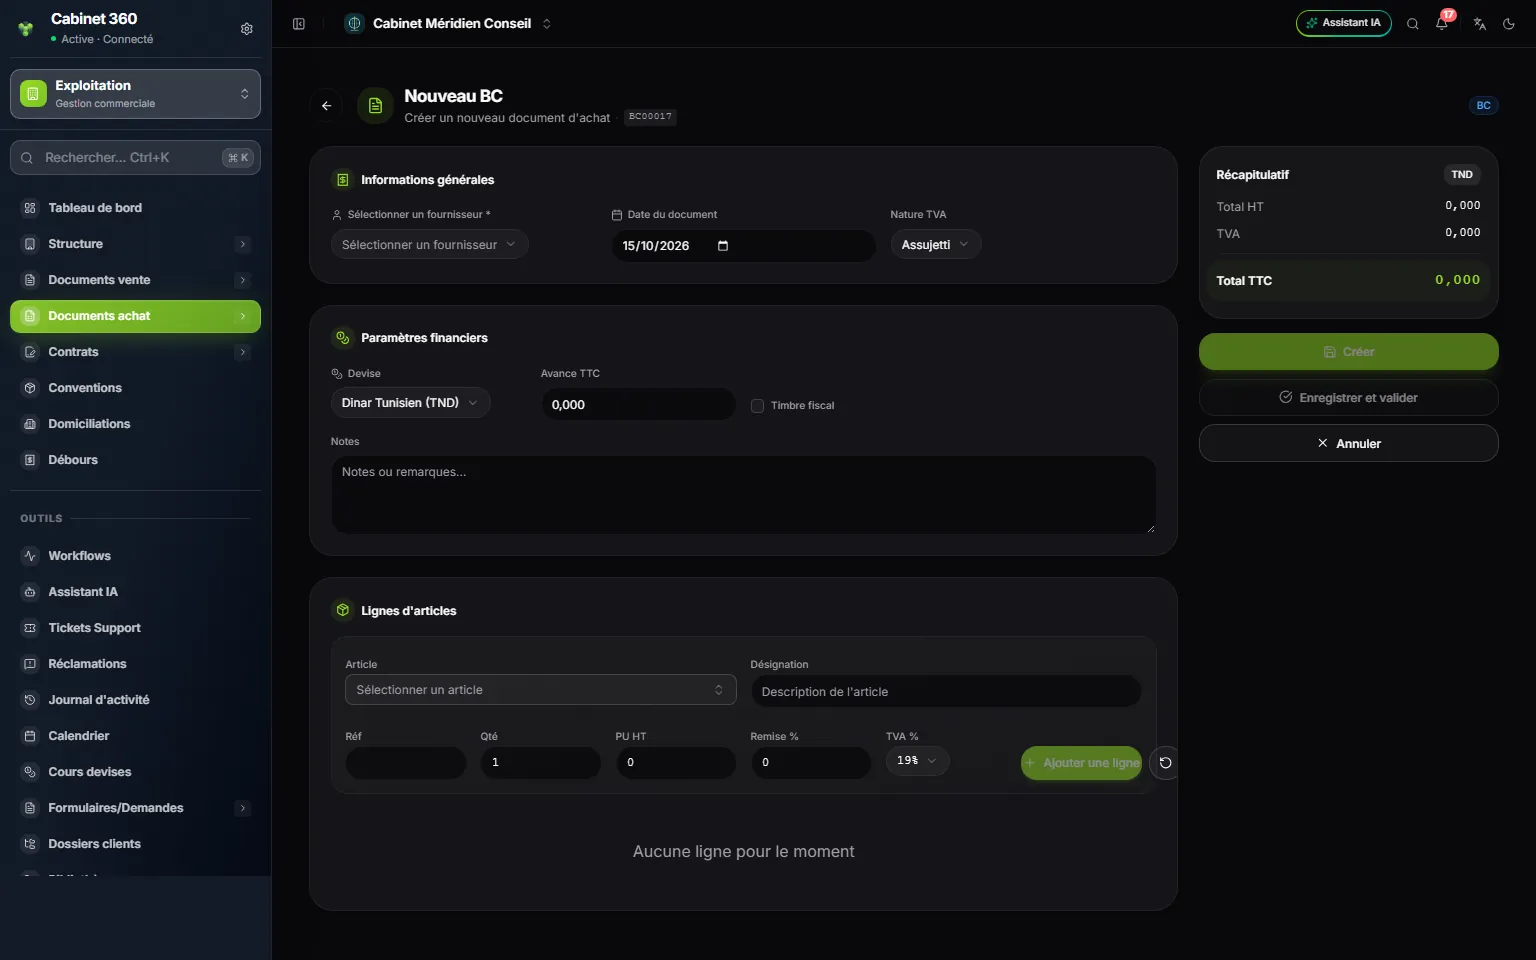
- 1. Select a supplier: required.
- 2. VAT nature: Subject to VAT, VAT Exempt or VAT Suspension.
- 3. Currency: TND, or a foreign currency and its exchange rate.
- 4. Fiscal stamp: only the purchase invoice counts it.
- 5. Article: it fills in the designation, the purchase price and the VAT.
- 6. Create (draft) or Save and validate.
The planned number, for example BC00001, shows under the title. It is assigned on save, drafts included.
General information: the supplier, the Document date and the VAT nature.
- Subject to VAT: the VAT of each line is calculated.
- VAT Exempt or VAT Suspension: no VAT is calculated. For VAT Suspension, also enter the Supplier PO number and its date.
Financial parameters: the Currency (TND, EUR, USD, GBP, MAD, DZD, LYD) and, for a foreign currency, the Exchange rate to enter. Then the Advance (incl. tax), the Fiscal stamp box and the Notes.
Article lines: choose an Article or type a free Designation, then the Qty, the Unit Price (excl. tax), the Discount % and the VAT %, from the list of rates that the platform opens to purchases. Click Add a line: the line enters the table. Click it to correct it.
On the right, the Summary gives the Total (excl. tax), the VAT and the Total (incl. tax). The stamp is added to it on an invoice where the box is ticked; the advance and the Net to pay, when an advance is entered. Create saves as a draft; Save and validate does both at once. Both stay greyed out until the supplier is chosen.
The purchase order
- Click New PO.
- Choose the supplier, check the date, add the lines.
- Click Create: the order's page opens, with its number.
- Click Validate at the top of its page: “Document validated successfully”.
As long as it is Validated and without a receipt, the order counts on the dashboard among the “purchase orders awaiting reception”. To pay the supplier an advance on this order, use a payment order of type Supplier advance: book Finance & Cash Register.
The goods receipt
The goods arrive. Record what was actually delivered.
From a purchase order
- In Purchase Orders, click the row of a Validated order, then Generate receipt in the Quick actions.
- The Generate a Reception Note window takes over the order's lines. Correct the Qty of each line according to what arrived, or remove a line.
- Click Generate BR: “Document created”. The purchase order moves to Transformed.
- In Receipts, open the new receipt and validate it.
From several orders: tick the validated purchase orders of one supplier, then click Generate BR in the bar that appears. The Generate one BR from multiple BCs window combines their lines.
Without a purchase order: New Receipt, then the same entry as for a purchase order.
The purchase invoice
From a goods receipt: open the validated receipt, click Generate invoice. The window takes over its lines and suggests a Due Date. Finish with Generate FA.
Directly:
- In Purchase Documents › Purchase Invoices, click New Invoice.
- Choose the supplier and put the date of their invoice in Document date.
- Choose the VAT nature. Tick Fiscal stamp if the supplier's invoice carries one: 1,000 TND is added to the total.
- Add the lines, then compare the Summary with the paper invoice.
- Click Create, or Save and validate.
An example: 20 reams at 8,500 TND excl. tax, VAT 19 %, give 170,000 TND of Total (excl. tax), 32,300 TND of VAT, 1,000 TND of Fiscal stamp and 203,300 TND of Total (incl. tax).
Having the AI read the invoice
You have the invoice as a PDF or a photo? On the Purchase Invoices list, click Import PDF, choose the file, then Extract with AI. Extractor (OCR) opens the list of extractions to review. Check the data read, then click Create purchase invoice: it arrives as a draft, to be validated. The details are in the book Artificial intelligence: OCR & AI Assistant.
Paying a purchase invoice
An invoice that is not validated cannot be paid. Once validated, it is paid by:
- a payment order, in Finance › Supplier Payment: it settles the invoice, declares the withholding tax and issues the certificate;
- or a Supplier Payments expense in the cash register.
The details are in the book Finance & Cash Register. The withholding tax is not entered on the invoice: it is declared on the payment order.
The supplier credit note
The supplier gives you something back: returned goods, a discount after the fact, an invoicing error.
From the invoice: open a Validated purchase invoice, click Generate a Credit Note. The window takes over its lines: lower a Qty or remove a line for a partial credit note. Finish with Generate AV. The invoice moves to Transformed.
Without starting from an invoice: Purchase Documents › Credit Notes, New Credit Note. To take over an invoice, choose it in Source invoice (FA): the supplier, the VAT, the currency and the lines fill in, and the credit note is dated today.
A credit note carries neither a fiscal stamp nor an advance. It is not paid: it does not appear in payment orders, which only list invoices.
The page of a purchase document
Full page, in the panel, opens the document in large: Chain History (BC → BR → FA → AV, each document opens with a click), the supplier, the general information, the references, the lines, the VAT Detail, the Summary and the history of changes.
Printing and producing the journal
- The PDF of a document: ⋯ menu of the row, Download PDF; on its page, Print prints this same PDF. Its title, printed in French, is BON DE COMMANDE, BON DE RÉCEPTION, FACTURE FOURNISSEUR or AVOIR FOURNISSEUR.
- The purchase journal: the Export button of a list, in CSV, Excel or PDF. It covers the list's document type, between the dates of the filter.
- Export / Import: your documents in CSV or in Excel. On import, the number column is taken as it is: your series counter is not used up.