
The list of leads
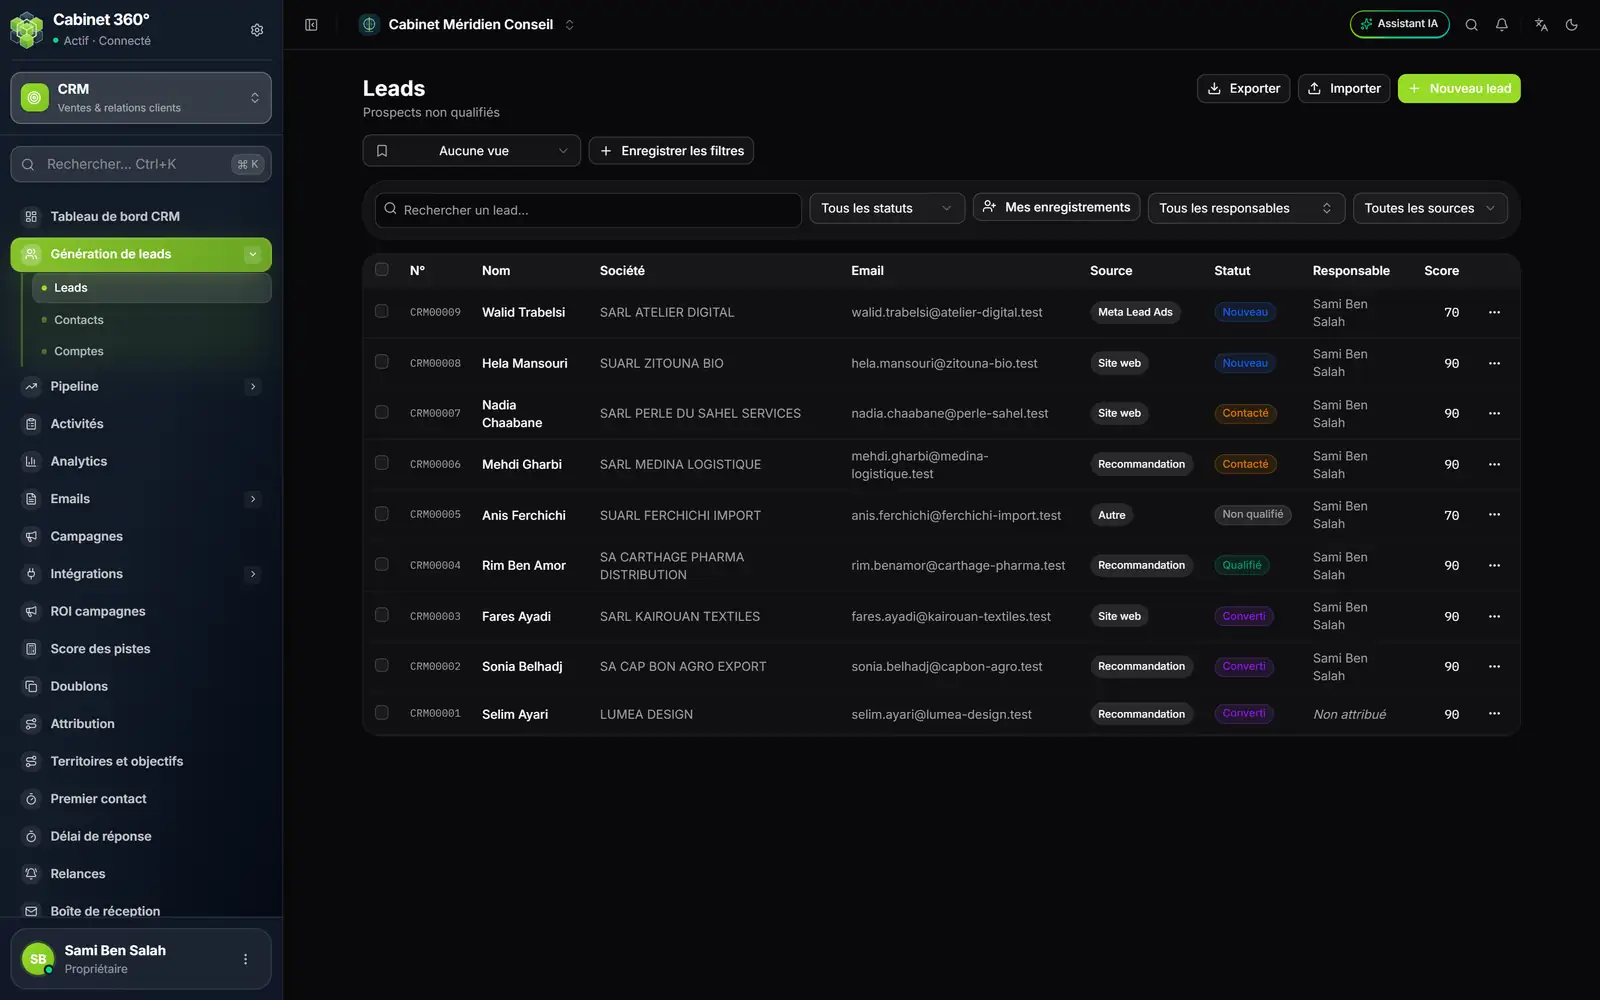
- 1. New lead: enter a lead by hand.
- 2. Import: bring in a whole file (chapter 4).
- 3. Export: the list as CSV, Excel or PDF.
- 4. The views: reopen saved filters, or save the current filters.
- 5. The search: number, first name, last name, company, email or phone.
- 6. All statuses, All sources: filter the list.
- 7. My records: only your leads.
- 8. The ⋯ menu: View, Edit, Convert, Delete.
The list shows 25 leads per page. Its columns: #, Name, Company, Email, Source, Status, Owner (« Unassigned » when there is none) and Score. Click a row to open the lead record.
Four filters narrow the list:
- All statuses: New, Contacted, Qualified, Unqualified or Converted.
- My records: the leads you own.
- All owners: the leads of one staff member.
- All sources: Meta Lead Ads, Website, Manual, Import, Referral or Other.
Saving your filters under a name
Does a sort come back often, for example « Qualified leads from the website »? Save it.
- Set the status, the source or the owner.
- Click Save filters.
- Enter the View name, then click Save.
- Later, choose the view in the No view list: the filters come back, and the « View: » badge followed by its name appears. Clear view goes back to the full list.
A view keeps the status, the source and the owner. It keeps neither the search you typed nor My records. On a view you created, Update replaces its filters with the current ones, and the bin deletes it. Duplicate makes a copy of it.
Entering a lead by hand
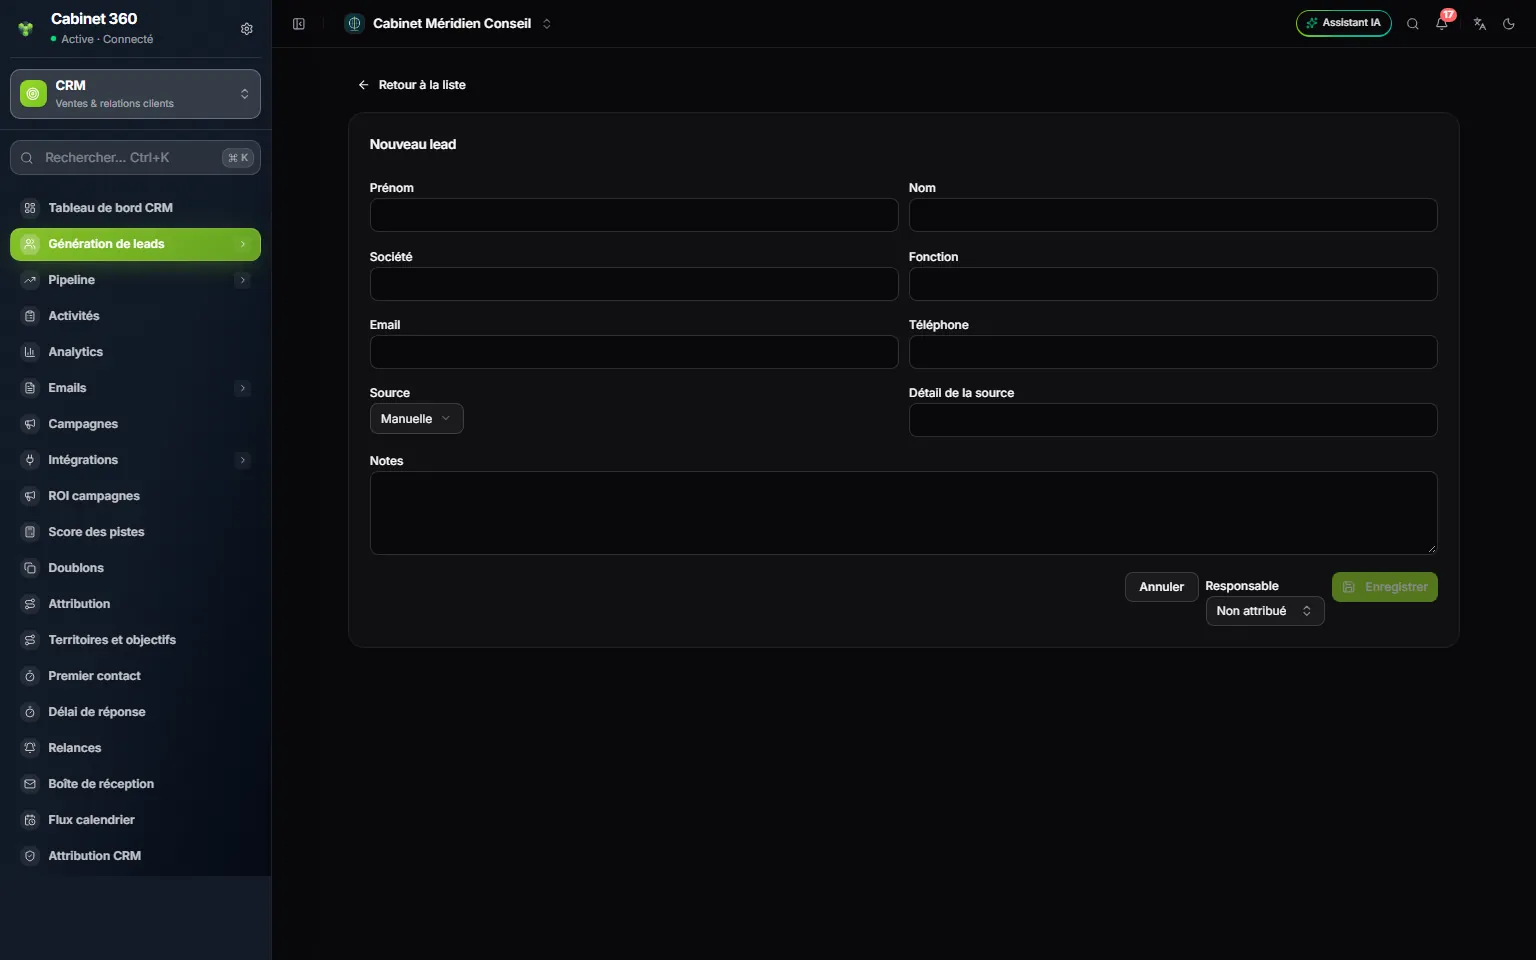
- 1. First name and Last name of the person.
- 2. Email and Phone: to reach them.
- 3. Source: where the lead comes from.
- 4. Source detail: free text, for example who referred them to you.
- 5. Notes: what you already know about their need.
- 6. Owner: the staff member who will follow the lead.
- 7. Save stays greyed out while something to identify the lead is missing.
- In the list, click New lead.
- Fill in what you know: First name, Last name, Company, Job title, Email, Phone.
- Choose the Source: Manual (the starting choice), Website, Meta Lead Ads, Instagram, Referral or Other.
- If needed, complete the Source detail and the Notes.
- Choose the Owner. Left on Unassigned, your Assignment rules pick one (chapter 13). An owner you choose is always kept.
- Click Save. The message « Created successfully » appears and the lead record opens, with its number and the New status.
The country, the city, the status and the estimated value are not on this form: you add them afterwards with Edit.
The lead record
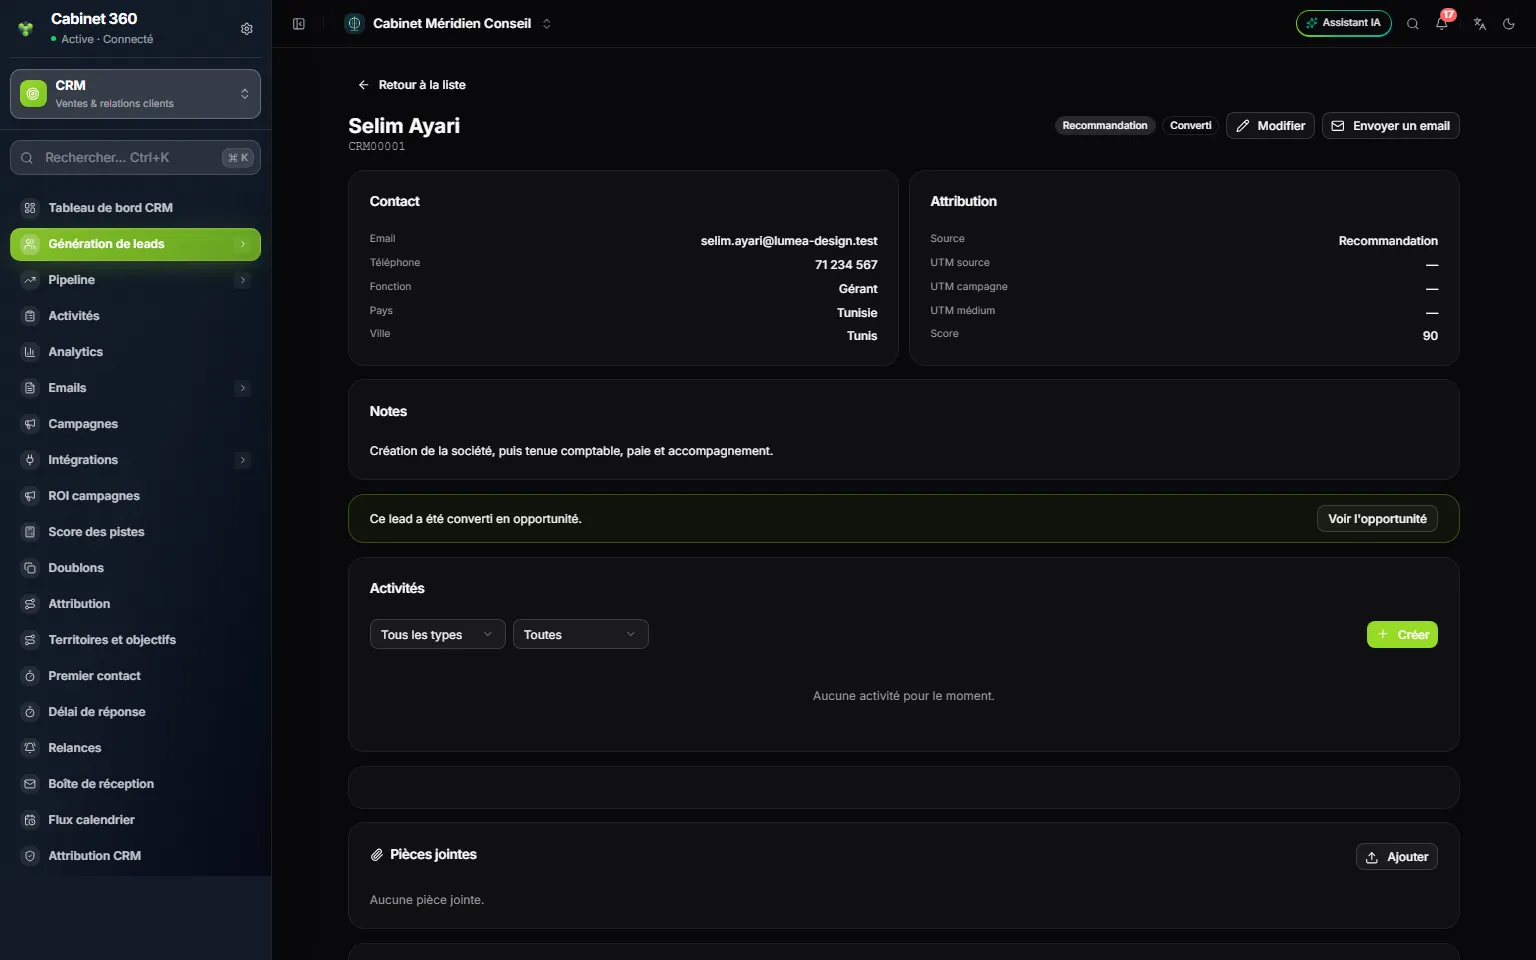
- 1. The name and the number of the lead.
- 2. The badges: the source and the status.
- 3. Edit: complete or qualify the lead.
- 4. Send email: visible when the lead has an address.
- 5. Contact: email, phone, job title, country, city.
- 6. Attribution: the source, the UTM fields and the score.
- 7. Score: from 0 to 100.
- 8. « This lead has already been converted. », with View opportunity.
- 9. Activities: calls, meetings, notes (chapter 7).
- 10. Attachments: the lead's documents.
The record brings together:
- Contact: Email, Phone, Job title, Country, City.
- Attribution: Source, UTM source, UTM campaign, UTM medium and Score. The three UTM fields are filled in by ads and tracked links; they are used to link the lead to a campaign (chapter 10).
- Notes, when they are filled in.
- Activities: the calls, meetings and tasks linked to the lead (chapter 7).
- Your custom fields, if there are any, then the Attachments.
- Audit: the history of changes, visible to the owner and the administrators.
At the top, three buttons: Edit, Send email (when the lead has an address) and Convert to opportunity (chapter 5).
The score
The score goes from 0 to 100. It is computed on its own, just after saving, from the rules in Lead scoring (chapter 12). Nobody enters it. If a lead shows 0 just after it was created, reload the page a moment later.
Moving the lead forward: the statuses
| Status | When to use it |
|---|---|
| New | The lead has just arrived; nobody has spoken to them yet. |
| Contacted | You have had a first exchange. |
| Qualified | The need is real and the lead is ready for a proposal. |
| Unqualified | No need, no budget, or cannot be reached. |
| Converted | The lead has become a contact, an account and an opportunity. |
- On the record, click Edit. The Edit lead page opens.
- Choose the Status that matches your exchange.
- While you are there, complete the Country, the City and the Estimated value: the amount you expect from the deal, with a comma or a point, for example 12 500,500.
- Click Save. The button stays greyed out while nothing has changed.
The first four statuses can be changed freely, in both directions: an Unqualified lead can become Contacted again. Converted is never chosen by hand: only conversion sets it, and a converted lead never goes back.
Assign, delete, export
Acting on several leads at once
Tick rows, or the header box Select all on this page. The « … selected » bar offers:
- Send email: write to the ticked leads (chapter 9);
- Assign: choose an Owner in the « Assign leads » window, then click Assign followed by the number of leads;
- Delete: remove the ticked leads;
- Clear: untick everything.
Deleting a lead
Open the ⋯ menu of its row, or tick it, then click Delete. Type DELETE to confirm.
Exporting the list
- Filter the list: the search, the status and the source are carried into the file.
- Click Export, then Export CSV, Export Excel or Export PDF.
- The file downloads.
For each lead, the file gives its number, first name, last name, company, email, phone, source, status, score, owner and creation date.
Frequently asked questions
How do I avoid duplicates?
Search for the name, email or phone in the list before creating the lead. To merge two records already created, see Duplicates in chapter 12.
I do not see all the firm's leads.
The firm may have limited each salesperson's view to their own records (chapter 2). A lead with no owner is then only visible to the owner, the administrators and the roles that hold CRM - All records, until someone gives it an owner.
Can a lead arrive without anyone entering it?
Yes: through a file, through the form on your website or through your Meta ads. That is the subject of the next chapter.