
Importing a file of leads
Do you have a list of contacts in Excel? Import it in one go.
Preparing the file
- An Excel or CSV file of 4 MB at most, with the column titles on the first row and one row per lead.
- 10,000 rows at most per file. Beyond that, only the first 10,000 are imported, and a message says so.
- Each row must give an email, a phone, or the first name with the last name. Here, a company alone is not enough.
- In an Excel workbook (.xlsx) with several sheets, only the active sheet (the one that was open when it was saved) is read; for an .xls or an .ods, it is the first sheet.
The four steps
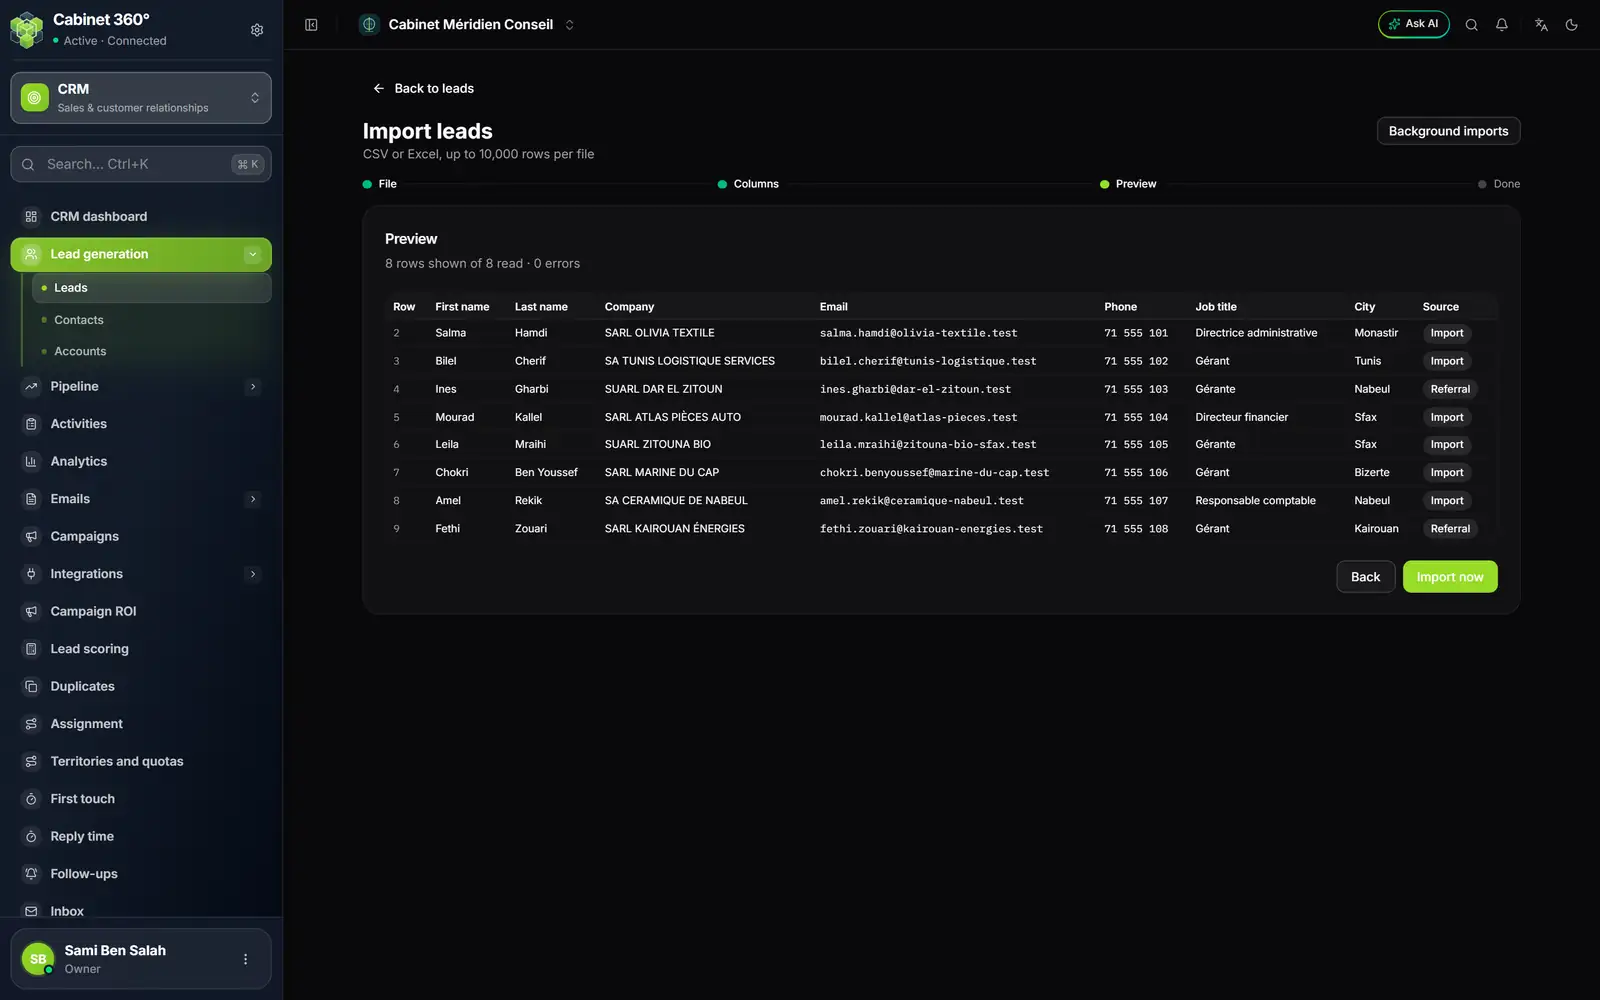
- 1. Background imports: import without waiting for the end.
- 2. The steps: File, Columns, Preview, Done.
- 3. The preview summary: rows shown, rows read, errors found.
- 4. Source: taken from your column, otherwise « Import ».
- 5. Back: go back to the columns.
- 6. Import now: create the leads.
- File: drag your file into « Drop file here », or click to choose it. Parsing… appears, then the next step.
- Columns (« Match the columns »): each column of your file has a list. Common titles, in French or in English, are already matched. Otherwise, choose the field: First name, Last name, Company, Email, Phone, Job title, Country, City, Source or Notes, or Ignore this column. Click Next.
- Preview: check the first rows read, with the columns you chose. A yellow frame lists the errors, with their row number, for example « Ligne 3 : adresse e-mail invalide. » (in French: row 3, invalid email address). Click Import now.
- Done: « Import complete » gives Rows read, Created, Skipped (invalid) and Skipped (duplicate). Show … error(s) details the refused rows. Click Go to leads, or Import another file.
What the import refuses and what it gives
- A refused row: a badly formed email (even with a name), or no email, no phone, and no first and last name. It counts in Skipped (invalid). Empty rows are skipped silently.
- A duplicate: a row whose email already exists on a lead of the firm, or higher up in the same file. It counts in Skipped (duplicate). The phone is not compared.
- Each lead created gets the New status. Its source comes from your Source column (Website, Referral… in French, in English or in Arabic); empty or unknown, it becomes Import. Its owner is chosen by your Assignment rules (chapter 13) and its score is computed afterwards.
The status, the owner, the estimated value and the UTM fields are not imported: you set them afterwards on each record, or in bulk with Assign for the owner.
Background imports
To start an import without waiting for the end, click Background imports. The « Asynchronous lead import » page opens. The limits stay the same: 4 MB and 10,000 rows.
- Choose the file (4 MB at most).
- Click Preview if you want to see the first five rows. Here, there is no columns step: the columns are recognised from their titles.
- Click Start the import. A bar follows the progress: « … of … rows processed ».
- Cancel stops the import between two batches of rows; a cancelled import writes nothing.
- The History keeps each import, with its file, its status (Pending, Running, Completed, Failed or Cancelled) and its counters.
Receiving the leads from your website
A web form links a page of your website to the CRM: each visitor who fills it in becomes a lead, with the Website source.
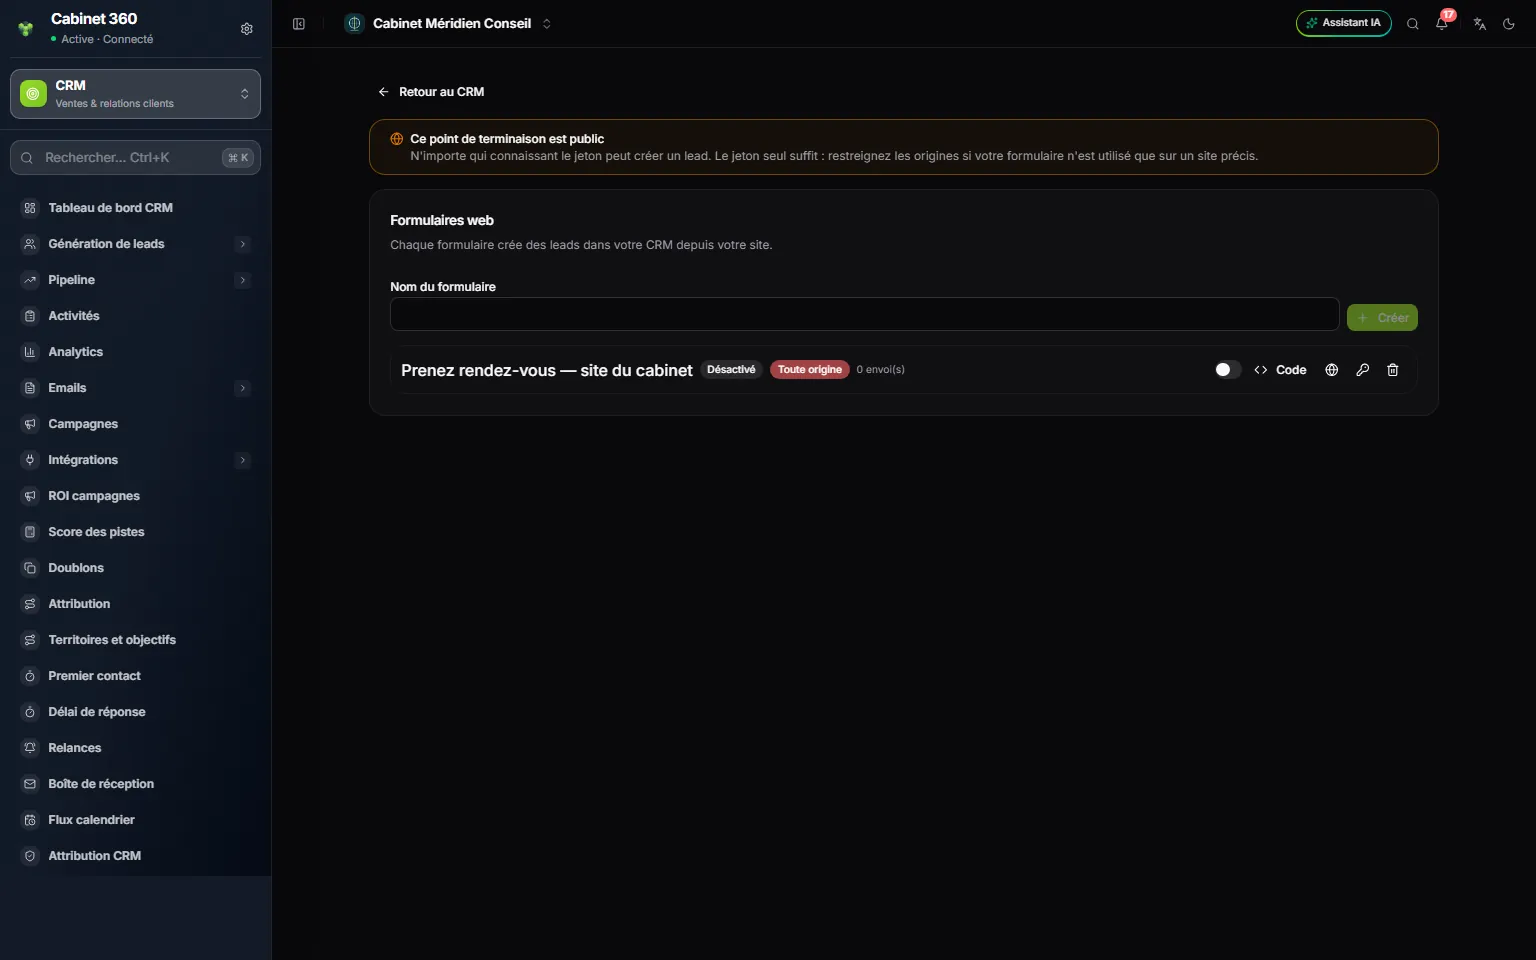
- 1. « This endpoint is public »: whoever knows the form's token can create a lead.
- 2. Form name: for example the name of the page that will carry it.
- 3. Create: the form is added to the list, switched off.
- 4. The form, with its badges: Off or Live, the allowed origin, the number of submissions.
- 5. The switch: turn the form on or off.
- 6. Code: the code to paste into your website.
- 7. The globe, the key, the bin: the allowed origins, a new token, deletion.
- Enter the Form name, then click Create. « The form was created. It stays off until you enable it. »
- Click Code. Copy the code and give it to the person who manages your website: they paste it into a page. It contains the fields Prénom, Nom, Société, Fonction, E-mail, Téléphone and Votre message, the Envoyer button (these words are in French) and a hidden anti-robot field. The labels can change; the fields and the script cannot.
- Click the globe and enter the full address of your website, one per line, for example
https://www.yourfirm.tn. Click Save origins. The red « Any origin » badge becomes « 1 origin(s) ». - Turn on the switch: the badge changes to Live.
- Test from your website. In Leads, a row appears with the « Website » source, and the form's counter changes to « 1 submission(s) ».
Each submission creates a New lead, with the Website source. The form's name goes into the Source detail, the visitor's message into the Notes. Its owner is chosen by your Assignment rules. The E-mail field of the code provided is mandatory; a submission with neither email nor phone is refused, and beyond 30 submissions per hour from the same IP address, submissions are refused.
The key renews the token (Rotate the token): the code already pasted stops working at once, and the new one must be pasted. The bin deletes the form (Delete the form), with the same effect.
Receiving the leads from your Meta ads
If you advertise on Facebook or Instagram with lead forms (Meta Lead Ads), the CRM can receive these leads on its own.
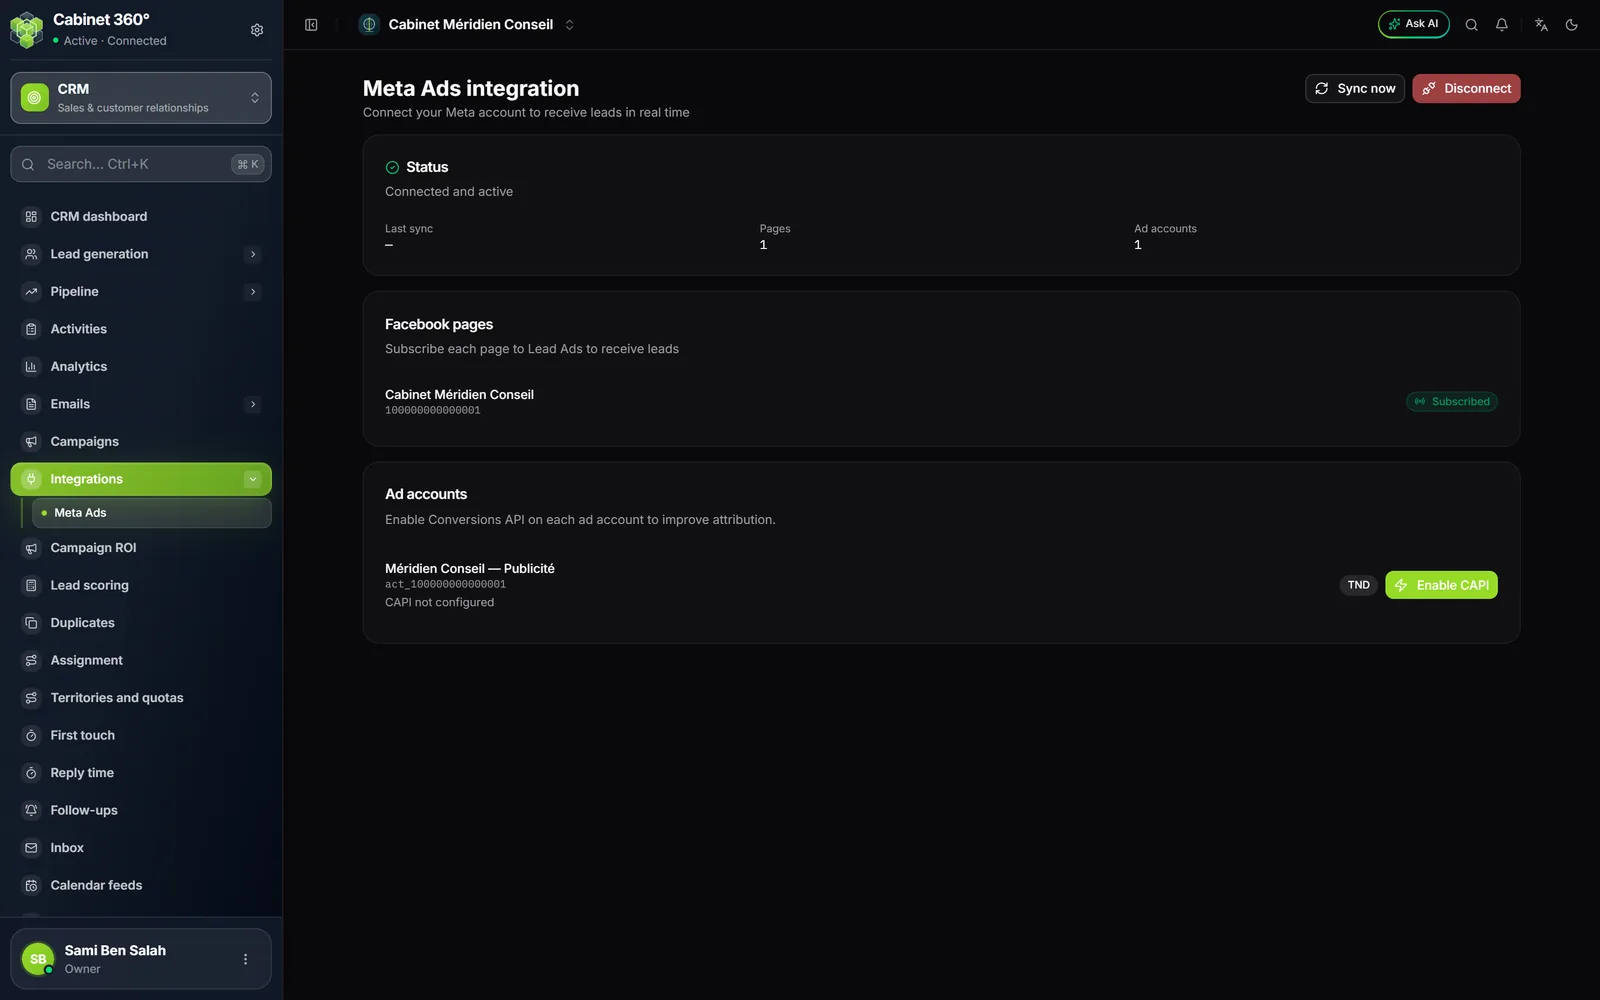
- Click Connect Meta and sign in with the Facebook account that manages your pages and your ads.
- In Facebook pages, click Subscribe for each page whose leads you want to receive. The button becomes Subscribed.
- Sync now restarts, in the background, the reading of the campaigns and forms of your pages and accounts already linked. It does not fetch leads and does not add a page.
Each Meta lead arrives with the Meta Lead Ads source and the New status. The name of the ad campaign goes into the Source detail and into UTM campaign: this is what links it to your campaign in Campaign ROI (chapter 10). Its owner is chosen by your Assignment rules.
Frequently asked questions
The import refuses my file.
Check its size (4 MB at most) and its format (Excel or CSV). A CSV can separate its columns with a semicolon, a comma, a tab or a vertical bar: all four are recognised.
No lead arrives from my website.
The badge must say Live. Your website's address must appear exactly the same in the origins: with or without www, http or https all count. The page must carry the form's current code, the one from after the last token change.
Imported leads do not show up live.
This is normal: the « New lead received » message does not appear for an import. Reload the list.