
Before you start
The file needs a journal of type Bank, with its Counterpart account: the bank's account (532…), of nature Bank in the chart of accounts (see chapter 3). Without this account, the screen says so: “This journal has no contra account — set it on the journal record.”
Imports require the rights of the 2. Imports screen; ticking requires the Create right on Bank reconciliation.
Importing an Excel or CSV statement
The Bank statements page shows two cards: Excel or CSV statement, handled on this page, and PDF or scanned statement, which goes through the OCR inbox. Each movement becomes an entry, posted against the bank's account.
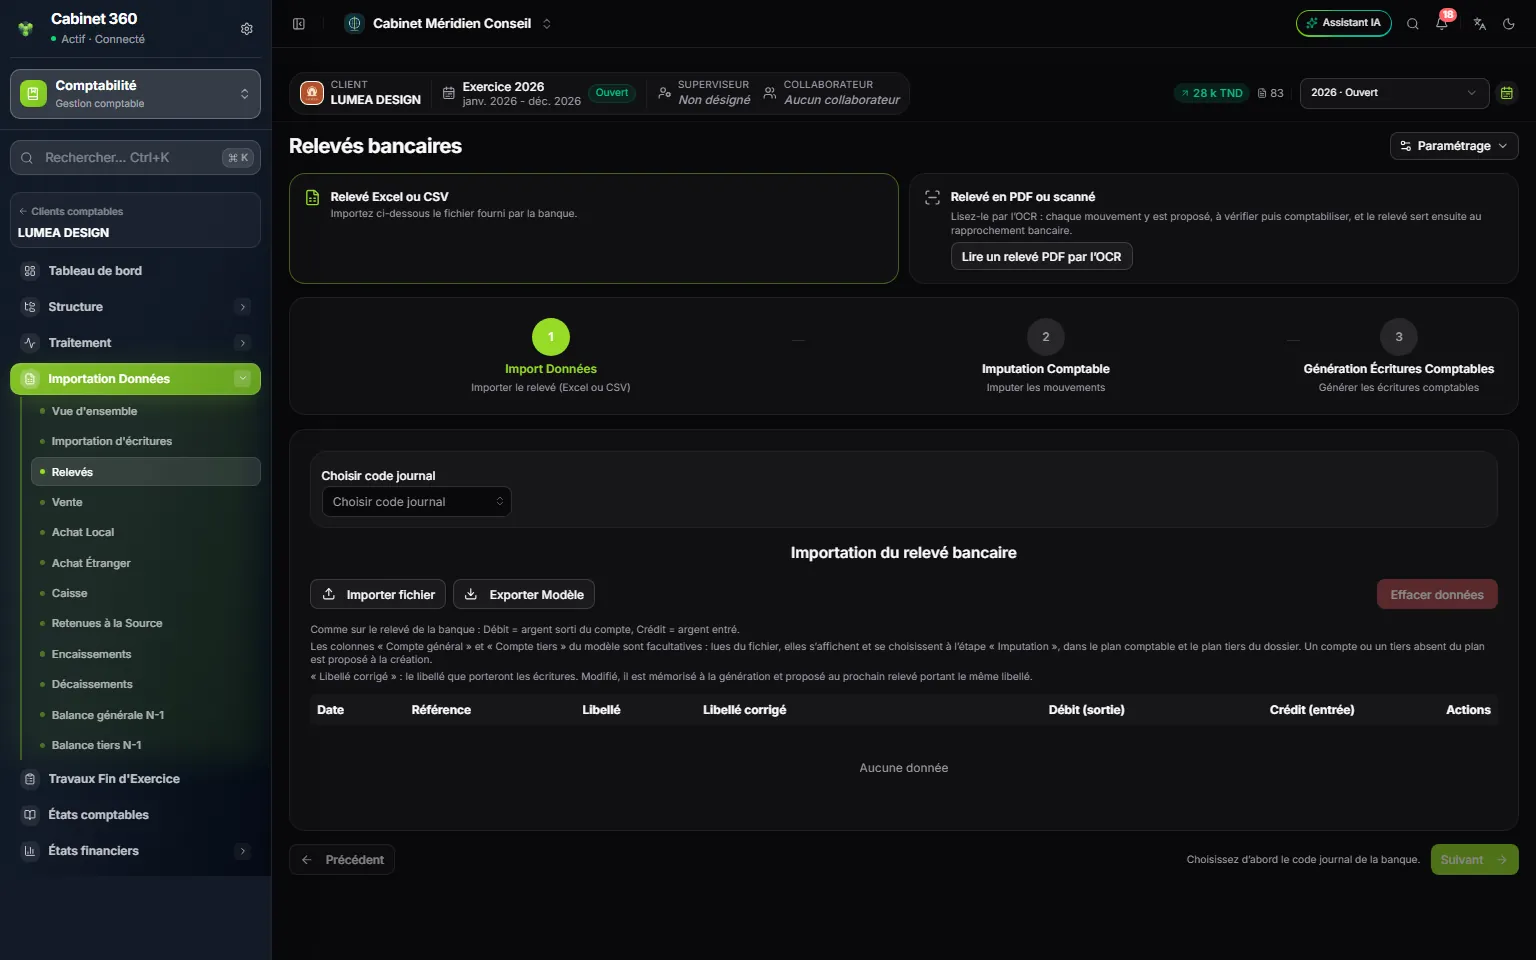
- 1. Excel or CSV statement: the file your bank gives you, handled on this page.
- 2. PDF or scanned statement: opens the OCR inbox, with the “Bank statement” type already chosen.
- 3. Three steps: import, account assignment, generation of the entries.
- 4. The bank's journal: to choose first; its bank account is shown.
- 5. Import file, or Export template to start from the seven-column template.
- Open Pick journal code and choose the bank's journal. The screen shows “Bank account:” followed by its number.
- Click Import file. An export from the bank will do; the template gives seven columns: Date, Référence, Compte général, Compte tiers, Libellé, Débit, Crédit (date, reference, general account, third-party account, label, debit, credit; the headers stay in French in every language). The two account columns are optional. Balance or total lines are set aside, and the message counts them. Several files can be added.
- Read Debit and Credit as on the statement: Debit (out) is money that left the account, Credit (in) money that came in.
- In the By label view, similar labels are grouped, the reference set apart: “COMMISSION 8215043” and “COMMISSION 8213161” form the COMMISSION group. Enter the group's New label: this is the label the entries will carry. A group's arrow shows its movements, one by one. The By movement view keeps the table line by line: the pencil corrects a movement, the bin removes it.
- Click Next. At the Account Assignment step, choose one General account per group: it applies to all its movements. The Third-party account, on the other hand, is chosen movement by movement, because the same label (“virement client”) can refer to different customers. For an account that requires a third party, the group opens by itself and announces, for example, “2 third parties to enter — detail by movement”.
- At the Journal Entry Generation step, check the preview, then click Post entries. The message “Entries posted” gives the summary, for example “24 validated voucher(s) · 48 line(s)”.
What the software remembers: green and blue
At each posting, IntegraSys remembers for this file the new label and the account of each group, by direction: interest received and interest paid are not mixed up. On the next statement, Excel, CSV or PDF read by OCR, the same group gets them straight away, in green, even if the references have changed. They can still be changed; a field you change is no longer green. For a customer or a supplier, only the general account (411, 401) is remembered, never the third party.
When nothing is remembered yet, an allocation rule looks for an account in the file's chart from the label, and proposes it in blue, with the rule's name under the field, for example “Rule “Commissions et frais bancaires” — to check”. The rules cover:
| Label | Root looked for |
|---|---|
| Commissions and fees | 627 |
| VAT on fees | 4366 |
| Overdraft charges, interest paid | 65 |
| Interest received | 75 |
| Cash | 58 |
| Salaries | 42 |
| CNSS | 453 |
| Taxes | 43 |
If the file's chart has no account under the root, nothing is proposed. The rules are shared by all files: they can be read in Settings › Accounting reference, tab Bank statement posting rules.
A PDF or scanned statement
Click Read a PDF statement with OCR: the OCR inbox opens with the Bank statement type already chosen. Each movement is proposed there, to check, with the same green memory and the same blue rules. The statement read is then used for the reconciliation. See chapter 5.
Doing the bank reconciliation
The reconciliation compares the statement with the entries of the bank account. You tick each movement against its entry, until the difference is zero. Nothing is created: only entries already posted are ticked. To load a statement, you also need View and Create on OCR (Pre-accounting).
- In Bank account, choose the account. The list only shows accounts of nature Bank: if it is empty, correct the account's nature in Chart of Accounts.
- Click Import a statement (PDF). In the Statement OCR window, the Bank journal is deduced from the account. Choose the file (PDF or image, 4 MB at most for now), then click Read the statement.
- The statement read appears on the left, the Account entries on the right. Check Statement balance, Book balance, Ticked balance and Difference. If the Closing date or the balance read are wrong, correct them and click Save.
- In Reconciliation assistant, read each proposal, its reason (“Same amount, the only one of the month”) and its confidence. Click Accept or Dismiss; Accept all validates the list.
- For the rest, tick the statement line and the entry that answers it. When the Difference in the Selection bar is zero, click Reconcile the selection.
- Carry on until you read “The whole statement is reconciled.” Each reconciliation gets a number: R1, R2…
A statement movement with no entry facing it is often an operation not yet posted: fees, overdraft charges. Enter it (chapter 4), then come back. If the difference does not fall to zero although everything is ticked, remember that the Ticked balance counts every entry ticked up to the Closing date, not only those of this statement: look for an older entry left unticked.
Without a digital statement, choose No statement — manual ticking in Bank statement, enter the Statement date and the Statement balance, tick the entries, then click Save the reconciliation. Export gives the reconciliation report in CSV, Excel or PDF.