
Showing an account
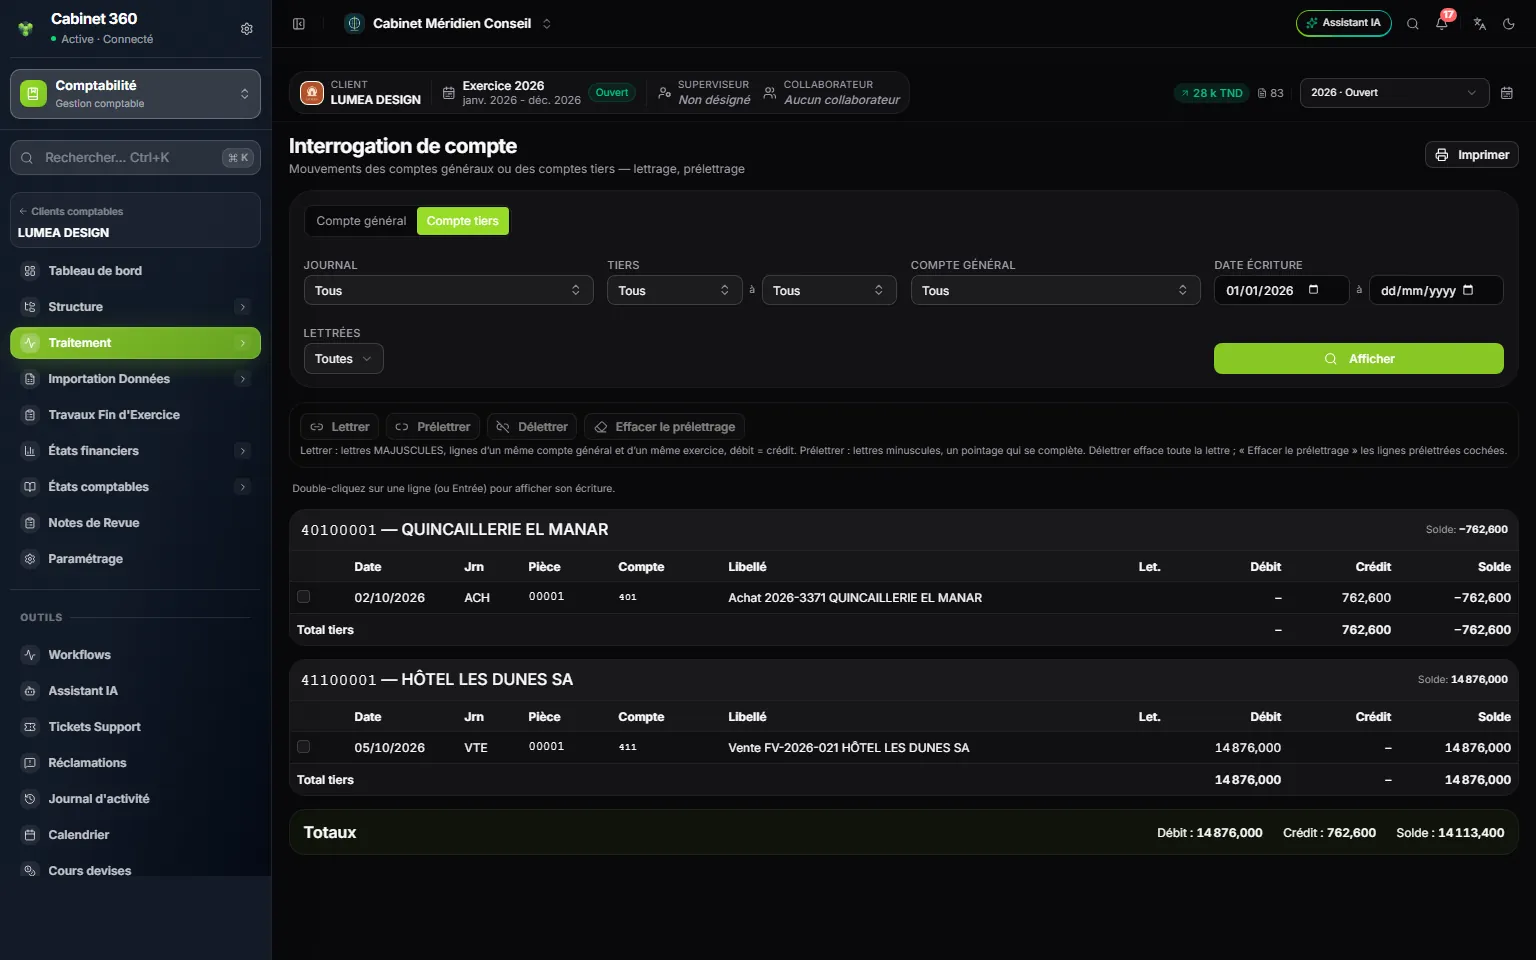
- 1. General account or Third-party account: what you inquire into.
- 2. The search fields: journal, range of accounts or third parties, dates.
- 3. Matched: All, Unmatched or Matched.
- 4. Show runs the search.
- 5. Reconcile, Pre-match, Unreconcile, Clear pre-matching: the matching actions.
- 6. The Rec. column receives the letter; the balance follows line by line.
- 7. The totals of everything shown.
- Choose General account or Third-party account. For a third party, you can limit the display to one General account.
- Set the Journal, the range of accounts (Account no.) or of third parties (Third party) and the Entry date, proposed from the first to the last day of the current fiscal year.
- In Matched, choose All, Unmatched (the items still open, pre-matched lines included) or Matched (the lines with a capital letter).
- Click Show.
A click on a column header (Date, Voucher, Label, Debit, Balance…) sorts the lines; a second click reverses the order, a third restores the ledger's order. Print always prints the report in the ledger's order.
Matching by hand
A match is written in capitals (A, B… AA). It brings together lines of the same general account, in the same fiscal year, whose debit equals the credit.
- Above the lines, keep Manual matching, chosen by default.
- Tick at least two lines: a click anywhere on the line, or on its box, or the space bar. The ticked line turns green. Under the buttons, the screen totals the selection: “2 lines checked — debit …, credit …, difference …”.
- If the debit equals the credit, click Reconcile. The letter goes into the Rec. column: “Matching “A” set on 2 lines”.
Pre-matching while waiting for the rest
A partial payment does not balance yet. Tick the lines and click Pre-match: they receive a lower-case letter (a, b… aa), with no balance check. To complete it, tick the lines of the pre-matching and the new ones, then Pre-match again. As soon as the pre-matching balances, the screen asks: “Pre-matching “a” (3 lines) is balanced: do you want to match the entries?” Yes turns it into a match. Clear pre-matching removes the letter from the ticked lines.
Unmatching
Tick a matched line, then click Unreconcile: the letter is cleared on all its lines, after confirmation. As soon as a matched line is ticked, Reconcile, Pre-match and Clear pre-matching turn grey: a matched line can only be unmatched.
Automatic matching
It matches in one go, among the lines shown that have no letter, each debit with a credit of the same amount, to the millime, on the same general account and, if there is one, the same third party.
- Show the lines to match, then choose Automatic matching above the lines. The tick boxes disappear.
- Click Preview automatic matching. Nothing is matched yet: the screen lists the pairs (Letter, Account, Third party, Amount, date and entry of the Debit and of the Credit) and sums up: “2 pairs to match (4 lines) — 1 line remains unmatched”.
- Click Match. Each pair receives its own letter, following those of the account.
Two different third parties are never matched together, even on the same collective account. When an amount repeats, debits and credits are taken by increasing date: the first debit with the first credit. A pre-matched line is left as it is. If a colleague changed a line between the preview and Match, the screen answers “Les écritures ont changé depuis l'aperçu” (the entries have changed since the preview) and matches nothing: run the preview again.
Opening a line's entry
- Double-click a line (or Enter): the entry opens. Edit corrects it, Save keeps it (see chapter 4). Esc brings you back to the inquiry, on the line you opened it from: the selection and the results are still there.
- The eye in front of a line: the entry carries an image. A click shows it; Open in a new tab opens it full size. Delete the image requires the Delete right on Document entry.
The Create right on Document entry opens matching.