
Entering a document
The page is titled “Add a voucher”. You need an open fiscal year, the chart of accounts, a journal, and the Create right on the Document entry screen.
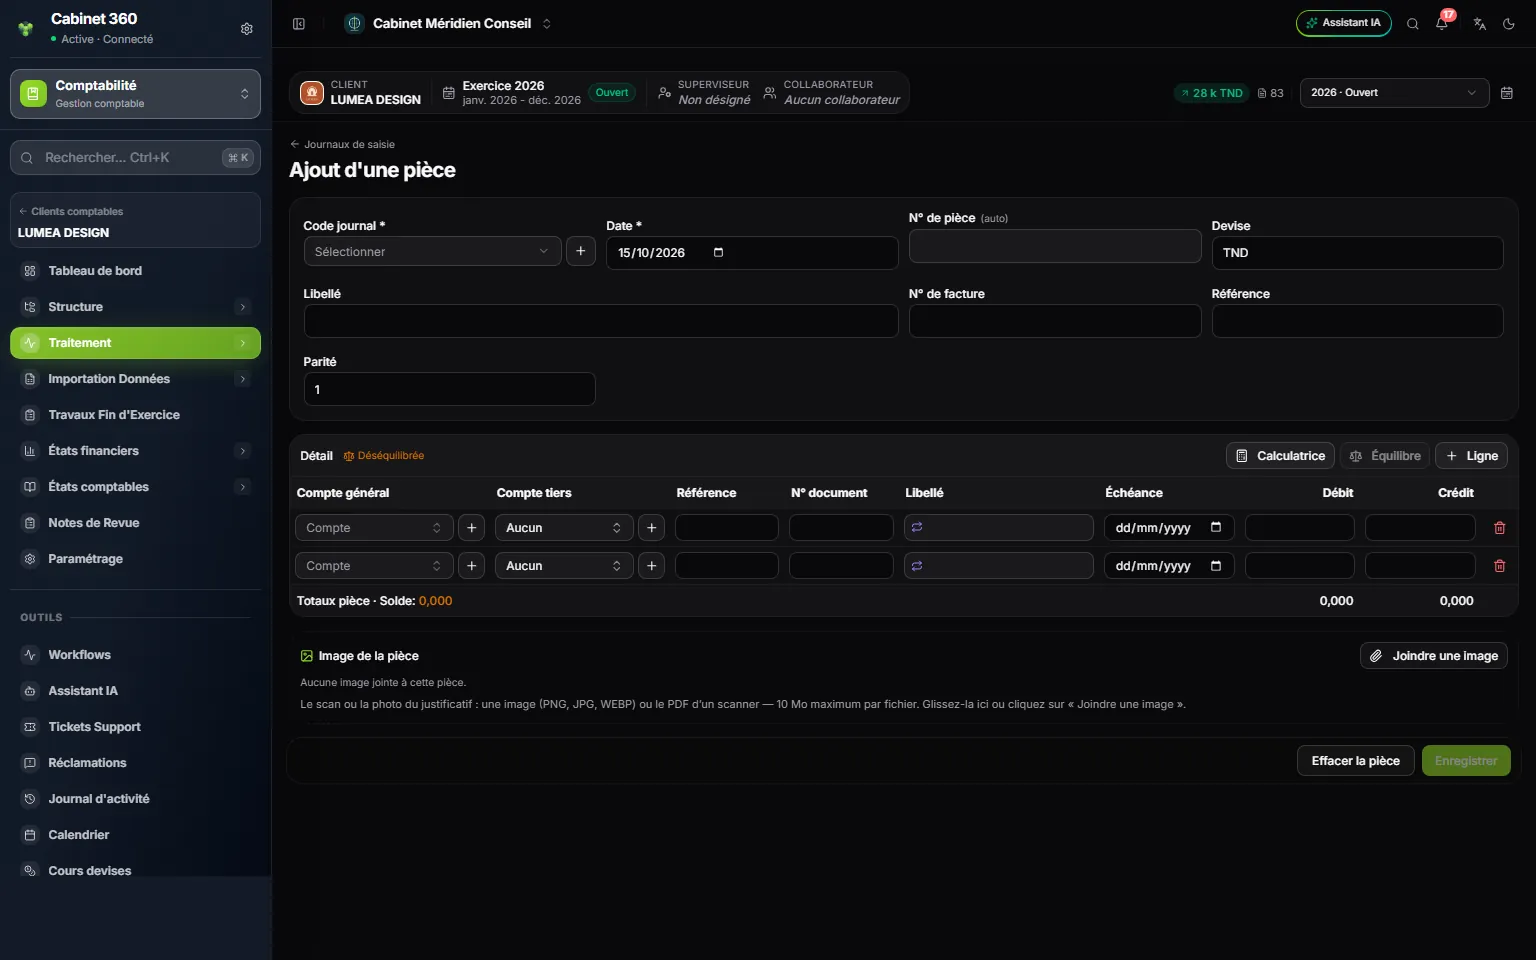
- 1. Journal code and Date: the journal gives the number, the date must fall within the fiscal year.
- 2. Voucher no.: filled in by itself, read-only. It is the journal's next number.
- 3. Label, Invoice no., Reference: the entry's header.
- 4. Unbalanced or Balanced: the marker follows what you type.
- 5. Calculator, Balance, Line: the line tools.
- 6. GL account, Third party, then an amount in Debit or Credit.
- 7. Attach an image: the scan or photo of the supporting document.
- 8. Save turns on when the entry is balanced.
- Choose the Journal code and the Date. The Voucher no. appears by itself: it is the journal's number, following the last entry. It cannot be changed: copy it onto the paper document.
- Enter the Label, and if needed the Invoice no. and the Reference. The Currency (TND) and the Rate (1) are proposed.
- In the lines, type the account in GL account: the list filters with each letter, on the number or the name, anywhere in the text and ignoring accents (“1012”, “capital” or “reserve” are enough). Enter or Tab keeps the highlighted account, Esc closes the list.
- Choose the Third party if the account requires it (401, 411…), then an amount in Debit or Credit. Typing an amount on one side clears the other. The first line's label takes the entry's, each following line the label of the line above.
- Click Save. The message “Entry no. 00013 saved” reminds you to copy the number. The page is ready for the next entry, with the same journal and the same date.
The counterpart that sets itself
In a Bank or Cash journal, the second line, and each line added with Line, takes the journal's counterpart account (marked with a double arrow), with the amount that balances the entry. Change the account or the amount to replace it. A simple payment therefore takes one typed line.
The calculator and the Balance button
With the cursor in a Debit or Credit field:
- Calculator: type a calculation, for example 1190/1,19, then click Insert into Debit — line 1: 1 000,000 goes into the field;
- Balance: the field receives the amount that balances the entry, on the side that settles it.
The entry's image
Under the lines, Voucher image › Attach an image attaches the scan or photo of the supporting document: PNG, JPG, WEBP or PDF, 4 MB at most per upload for now. On a new entry, the file is marked “attached on save” and goes with the entry. On an entry already saved, a click on the image's name shows it; the bin removes it after confirmation.
Fixed assets created at entry
An equipment invoice debits an intangible (21…) or tangible (22…) fixed-asset account. When you click Save, IntegraSys offers to create the assets right away, rather than at year end: “This entry debits 8 050,000 excl. VAT to fixed-asset accounts (21 and 22). Do you want to create the fixed assets recorded?”
- Click Yes (No (Esc) moves on to the next entry without creating anything).
- The Create the fixed assets window proposes one line per account debited. One invoice can create several assets, each in its own family: Add a fixed asset adds a line.
- For each asset, enter the Description, choose the Family (the Rate % follows from it), check the Account, the Acquisition date and the Gross value excl. VAT. The Code is given automatically (IMM00001…) if left empty.
- Under the lines, the Difference must be 0,000: the sum of the gross values equals the debit of the fixed-asset accounts. Then click Save the fixed assets.
The VAT deducted on the entry follows the assets, in proportion to their gross values. An entry that carries an amount on the credit of a fixed-asset account likewise offers to record the disposal: tick the assets disposed of, and their total disposal price must equal the credit. Editing or deleting such an entry later asks “Do you want to update your fixed assets?”. Fixed assets and their depreciation are in chapter 11.
Entering a whole month in a batch
Batch entry chains the entries of one journal over one month: an entry line at the top, the grid of the month's entries below. Each balanced entry saves itself with no other action.
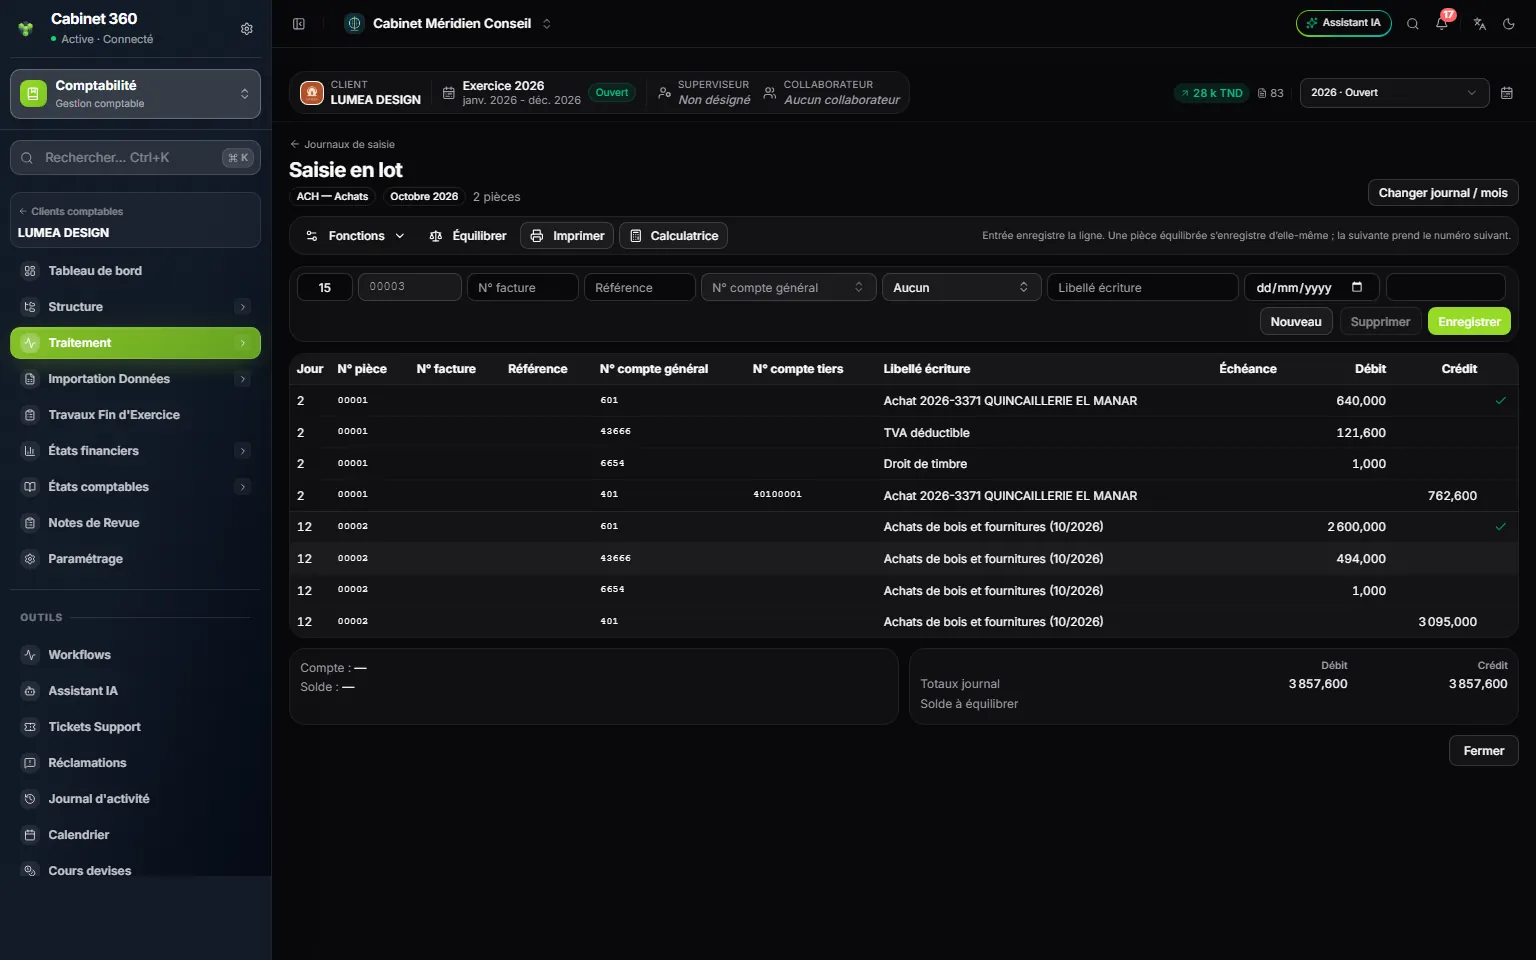
- 1. The batch's journal and month; Change journal / month at the top right.
- 2. The entry line: day, greyed voucher no., accounts, label, amount.
- 3. Save posts the line; New cancels, Delete removes.
- 4. The green tick: the balanced entry is saved.
- 5. The journal's totals for the month.
- In the Saisie en lot — journal & mois window (batch entry, journal and month), choose the Code journal (journal code) and the month, then click Commencer la saisie (start entry). This window is shown in French for now. This month's journal is reserved for you.
- In the entry line, fill in the Day, the General account and a Debit or a Credit. The Voucher no. is greyed: it is the journal's next number.
- Press Enter: the line joins the grid, and the next one stays in the same entry. In a bank or cash journal, the counterpart is set at the amount that balances: two Enter presses are enough for a simple entry. Otherwise, Balance sets that amount.
- As soon as an entry is balanced, it saves itself: a green tick appears to the right of its first line, and entry moves on to the next entry, with the next number.
- Click Close to leave.
An entry has only one date: the Day of its first line. An unbalanced entry stays in the grid, marked with a triangle: “Not saved: out of balance by 100,000”. A click on a line of the grid brings it back up into the entry line to correct it. The Functions menu offers New voucher, Delete the voucher and Add a line to voucher …. When you leave with unsaved entries, the screen offers Keep entering or Leave anyway.
Finding and editing an entry
Two paths lead to the same entry:
- Processing › Entry search: the Search criteria window searches by Search (label, voucher no., document no. or reference), General account, Third-party account, Journal code, dates or amounts. Click OK.
- Processing › Entry journals: double-click the period you want (a journal, a month), then a line.
Double-click a line, or press Enter: the entry opens, with its title (“Entry ACH 00012”), its lines, its totals and the Balanced mention.
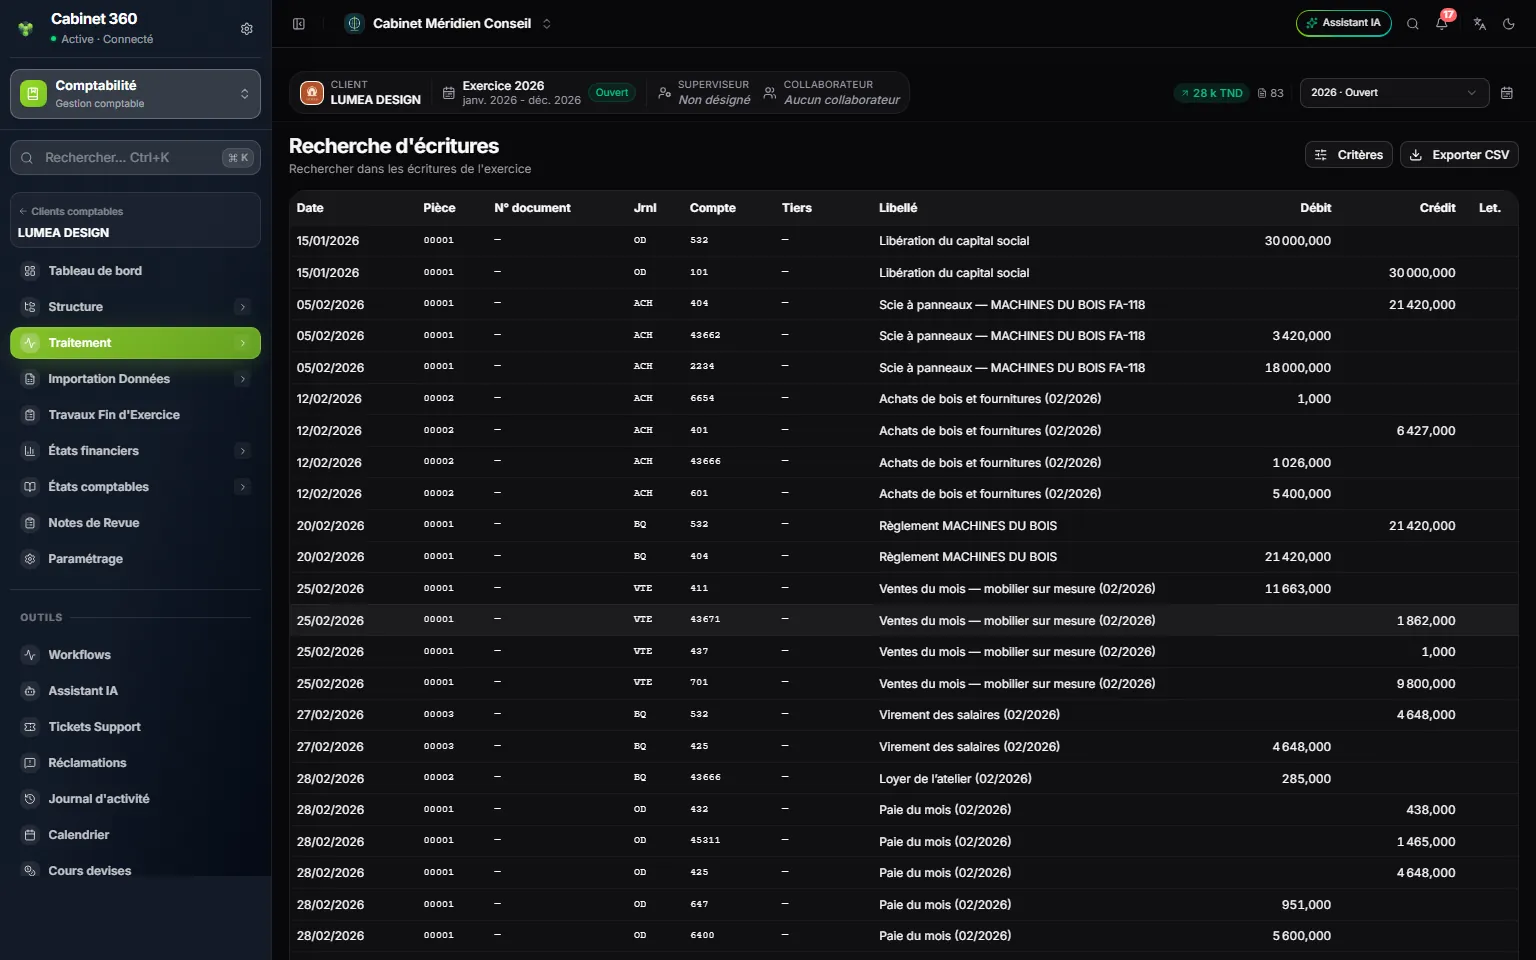
- 1. Criteria opens a new search; Export CSV opens the export menu: CSV, Excel or PDF.
- 2. The lines found: a double-click opens the whole entry.
- Click Edit, then correct the date, the label, the invoice no., the reference or the lines.
- Click Save. The button only appears once something has changed. The link at the top (“Search results” or “Journal ACH — March 2026”) leads back to the list.
- Upload an image attaches the supporting document. Delete asks “Are you sure you want to delete entry ACH 00012?”: the image goes with the entry.
An entry can also be deleted from Entry journals: in the month's window, a user who has the right to delete ticks the entries (ticking one line ticks its whole entry, so the deletion stays balanced), then clicks Delete. A matched line blocks the button until it is unmatched. The number of a deleted entry is never given again: the activity log keeps its lines (chapter 9).
Re-imputing: moving lines from one account to another
Re-imputation moves the lines of one account to another, amounts unchanged: each entry stays balanced. It is used after a repeated posting error, for example costs posted to 6061 instead of 6063 all year.
- In the Single reallocation tab, the Re-imputation settings window opens by itself. Under Source, choose the Source general account and, if needed, the Source third-party account (empty: all the account's lines). Under Target, the Target general account and, if needed, the Target third-party account (empty: each line keeps its third party).
- Set the scope: Open fiscal year or All fiscal years, the Journal, the Entry date. Exclude matched entries, ticked by default, leaves the matched lines on the source account.
- Click Validate: the Preview lists the lines that will move, with their totals. Nothing has changed yet.
- Click Apply, then confirm. The message gives the number of lines re-imputed.
With All fiscal years, the question “Delete the source accounts after the reallocation?” is added: a source account is only deleted if it no longer carries any entry. A closed fiscal year that carries lines concerned blocks everything: reopen it first. For several rules at once, the Multiple reallocation (Excel file) tab reads a workbook with four columns (Compte général source, Compte tiers source, Compte général cible, Compte tiers cible: source general account, source third-party account, target general account, target third-party account): each line is checked before Validate the reallocation, and a single refused line blocks the whole file. Audit entries are never touched.
Post entries: changing the code of an account or a journal
The Data update page (the recoding page, under the menu label Post entries) recodes a journal, a general account or a third party. The record keeps its identity: only its code changes, and its name if you wish. The entries of every fiscal year show the new code at once.
- Choose the Data type: Journal codes, Chart of accounts or Third-party accounts. The grid shows each record, with its current code and its name.
- Enter the New code (or New number) and, if needed, the New title. For an account, the list proposes the numbers already used in your other files and those of the standard chart, with their name.
- Replace, on one line, applies it at once. Replace all applies the whole grid after confirmation, all or nothing: a single refused line, and nothing is replaced.
The old code stays on the record (Former code, Former number): an entries file that still carries it is converted by itself on import (chapter 6). To recode a whole chart, start from the Import template, fill in the new codes, then Import correspondences: the grid fills in without writing anything, and nothing applies before Replace all.